Raspberry Pi- 4
This is pin website
The app
This is pin Leaf website

The app
Raspberry pi setup in raspberry pi image

This image is highlite setup steps
Here is a simple explanation of Booting in English:
What is Booting?
In simple terms, Booting is the process of starting a computer. It is the sequence of events that happens from the moment you press the Power Button until the operating system (like Windows, macOS, or Linux) is ready for you to use.
Why is Booting Necessary?
A computer’s main memory (RAM) is volatile, meaning it forgets everything when the power is turned off. When you turn the computer back on, the processor doesn’t know what to do. Booting “teaches” the computer how to work by loading the Operating System (OS) from the hard drive into the RAM.
The Steps of Booting:
- POST (Power-On Self-Test): As soon as you press the button, the computer checks its hardware. It makes sure the RAM, keyboard, and processor are all working correctly.
- BIOS/UEFI: A small chip on the motherboard provides the first set of instructions. It tells the computer where to look for the operating system.
- Boot Loader: The computer finds a tiny program called the Boot Loader on your storage (SSD or HDD). Its only job is to “fetch” the Operating System.
- OS Initialization: Finally, the Operating System loads into the RAM, and you see your Desktop or Login screen.
Two Types of Booting:
- Cold Boot: Starting a computer that was completely turned off.
- Warm Boot: Restarting a computer without turning off the power (like when you click “Restart”).
1. Core Setup Steps
- Device: Select your specific Raspberry Pi model (e.g., Raspberry Pi 5 or Raspberry Pi 4). This ensures the software matches your hardware architecture.
- OS (Operating System): Choose the “brain” of your Pi.
- Example: Raspberry Pi OS for general use or RetroPie for gaming.
- Storage: Select the microSD card or USB drive where you want to install (flash) the OS.
2. Customisation (Pre-Settings)
These settings allow you to configure the Pi before you even turn it on for the first time, making the first boot seamless.
Hostname
- Definition: A unique name for your Pi on the local network.
- Real-time Example: Naming it
mypi.local. Instead of memorizing a complex IP address (like192.168.1.15), you can just type this name in your browser or terminal to find it.
Localisation
- Definition: Sets your Time Zone, Keyboard Layout, and Country.
- Real-time Example: Setting the time to your local city so logs are accurate, and ensuring your keyboard keys (like
@or#) work correctly when you type.
User
- Definition: Creating a unique Username and Password for security.
- Real-time Example: * Username:
rahul_pi- Password:
Ami@Pi2024
- Password:
- How it works: When you turn on the Pi, a login box appears. You must enter these specific credentials to reach the desktop or command line.
Wi-Fi
- Definition: Pre-saving your Home Wi-Fi SSID (name) and Password into the OS.
- Real-time Example: The moment you plug in your Pi, it connects to the internet automatically. You don’t need to plug in a spare keyboard just to type in a Wi-Fi password.
3. Remote Access Methods
| Feature | Remote Access SSH (Secure Shell) | Raspberry Pi Connect |
|---|---|---|
| Location | Usually from the same Wi-Fi network. | From anywhere in the world (via internet). |
| Method | Text-based. You type commands in a terminal window. | Visual. You see the full desktop and use your mouse. |
| Best Use Case | For quick updates or changing system files. | When you need to see the screen or use GUI apps remotely. |
Raspberry Pi Remote Access Guide
When your Raspberry Pi is used without a dedicated monitor, keyboard, or mouse, it is called “Headless Mode.” Remote access allows you to control the device from another computer or mobile device.
1. Local Network Control (Same Wi-Fi)
If your Pi and your laptop are on the same Wi-Fi network, you can use these two methods:
SSH (Secure Shell)
- Purpose: Provides access to the Pi’s Terminal (Command Line).
- Experience: Running
ssh rasp1@192.168.1.xis SSH. It is very fast and efficient for text-based tasks.
if host is not identified

ssh-keygen -R 192.168.1.x
VNC (Virtual Network Computing)
- Purpose: Allows you to see and interact with the full Desktop screen.
- Experience: Tools like TigerVNC or RealVNC use this. It lets you use your mouse to click icons and open windows.
B. Via Command Line (Using Terminal) Open the terminal and type:
sudo raspi-config
Navigate to Interface Options and press Enter.
Select VNC and press Enter.
When asked, “Would you like the VNC Server to be enabled?”, select Yes.
Once the process is complete, press Esc or select Finish to exit.
What is VNC and How Does It Work?
VNC (Virtual Network Computing) is used when you cannot physically sit in front of your device. It consists of two parts:
- Server: This runs on your Raspberry Pi.
- Client (Viewer): This runs on your laptop, tablet, or phone to view the Pi’s screen.
Analogy: SSH vs. TigerVNC
- SSH (Command Prompt): Think of this as the Power Button of a TV. Without it, the TV won’t turn on (it handles the background commands).
- TigerVNC: Think of this as the TV Screen. Once the TV is powered on, the screen is where you see the pictures (the Graphical User Interface).
Controlling Your Pi Remotely (Away from Home)
To access your Pi when you are on a different network:
- Raspberry Pi Connect: The easiest and most secure way. Simply log in via a web browser to see your screen.
- VPN: Creates a secure “tunnel” to your home network, allowing you to access the Pi as if you were sitting right next to it.
Ways to Connect Your Raspberry Pi to a Network
There are several popular methods to connect your Pi. Choose the one that fits your needs:
1. Mobile or Laptop Hotspot (Wi-Fi Hotspot)
Currently the most popular cable-free method.
- How it works: You turn on your phone or laptop hotspot and connect the Pi to it.
- Benefit: The Pi stays connected to the internet, and you can control it from the same device.
2. Ethernet Cable (Direct Ethernet / ICS)
Connecting the Pi directly to your laptop or router using a cable.
- With a Laptop: Known as “Internet Connection Sharing” (ICS).
- With a Router: The most stable and professional method for high-speed tasks.
3. Local Wi-Fi Router
The Pi connects directly to your home Wi-Fi.
- Benefit: Any device connected to the same router can access the Pi.
4. USB Tethering
Sharing your phone’s mobile data via a USB cable.
- How: Plug the phone into the Pi via USB and enable “USB Tethering” in phone settings. The Pi treats this as a wired ethernet connection.
5. Serial Connection (UART / Serial Console)
Used when you have no monitor or network.
- How: Uses a USB-to-TTL adapter connected to the Pi’s GPIO pins.
- Use case: Fixing the Pi when network settings are broken.
6. Headless Setup
Configuring everything before the first boot.
- How: Using “Raspberry Pi Imager,” you pre-configure Wi-Fi and SSH settings on the SD card. The Pi connects to your network automatically the moment it powers on for the first time.
9. File Sharing (Transferring Data)
Sometimes you don’t need to see the screen; you just need to move files between your laptop and the Pi.
- SCP (Secure Copy): Uses the SSH protocol to securely move files via the terminal.
- Samba: Makes your Raspberry Pi folders appear as a Network Drive in your Windows File Explorer (under “This PC”).
1. What is SCP (Secure Copy Protocol)?
SCP is a secure way to copy files using the SSH protocol. It allows you to send files from your computer to the Raspberry Pi or pull files from the Raspberry Pi to your computer.
Sending Files to Raspberry Pi (Upload)
To send a file from your computer (e.g., myfile.txt) to the Raspberry Pi, use this command:
scp myfile.txt <username>@<pi_ip_address>:
To send to a specific folder: Add the folder name after the colon (:). (e.g., :project/)
Getting Files from Raspberry Pi (Download)
To bring a file from the Pi to your computer’s current directory:
scp <username>@<pi_ip_address>:myfile.txt .
(The dot . at the end represents your current folder/directory on your computer.)
Copying Multiple Files or Folders
- Multiple Files: List the filenames separated by spaces:
scp file1.txt file2.txt <user>@<ip>: - Using Wildcards: To send all text files at once:
scp *.txt <user>@<ip>: - Copying Folders: To copy an entire folder and all its contents, use the
-r(recursive) flag:scp -r project/ <user>@<ip>:
To see IP address in your device
hostname -I

or

nmcli device show
system update
sudo apt update && sudo apt upgrade -y
See temprature
vcgencmd measure_temp
Ram or memory chack
free -h
SSH logout
exit
4. Remote Access Summary Table
| Service | Interface | Network | Main Advantage |
|---|---|---|---|
| SSH | Command Line | Local | Fast and lightweight |
| VNC | Full Desktop | Local | Graphical interface (GUI) |
| Pi Connect | Browser Screen | Internet | Access from anywhere |
| Samba | Folders/Drives | Local | Easy drag-and-drop files |
Troubleshooting VNC Access on Raspberry Pi
If you can access your Pi via SSH (as rasp1@192.168.1.7) but TigerVNC fails, follow these steps to fix it.
1. The Reason for Failure
Modern Raspberry Pi OS versions use Wayland instead of the old X11 display system. Traditional VNC servers (like TigerVNC or RealVNC) often struggle with Wayland’s security layers.
2. Step-by-Step Fix (Via SSH)
Since you are already logged in as rasp1, run these commands in your terminal:
A. Enable the VNC Server
- Type:
sudo raspi-config - Navigate to: 3 Interface Options
- Select: I1 VNC
- Choose: Yes to enable it.
B. Switch to X11 (For better TigerVNC Compatibility)
If TigerVNC still won’t connect, you might need to switch the display backend back to X11:
- In
sudo raspi-config, go to: 6 Advanced Options - Select: A6 Wayland
- Choose: W1 X11 (Legacy).
- Select Finish and let the Pi Reboot.
3. Connecting via TigerVNC(Virtual Network Computing)
Once the Pi reboots, open TigerVNC on your Windows PC:
- VNC Server:
192.168.1.7(or192.168.1.7:5900) - Username:
rasp1 - Password: Use the password you created (e.g.,
Ami@Pi2024)
4. Alternative: WayVNC
If you want to stay on Wayland (the faster, newer system), TigerVNC might not be the best tool. You should use a VNC viewer that supports WayVNC.
Tip: If all else fails, try Raspberry Pi Connect. It works through your web browser and bypasses all VNC setup headaches!
Accessories of Raspberry pi
- Raspberry pi case , USB power supply and Active cooler
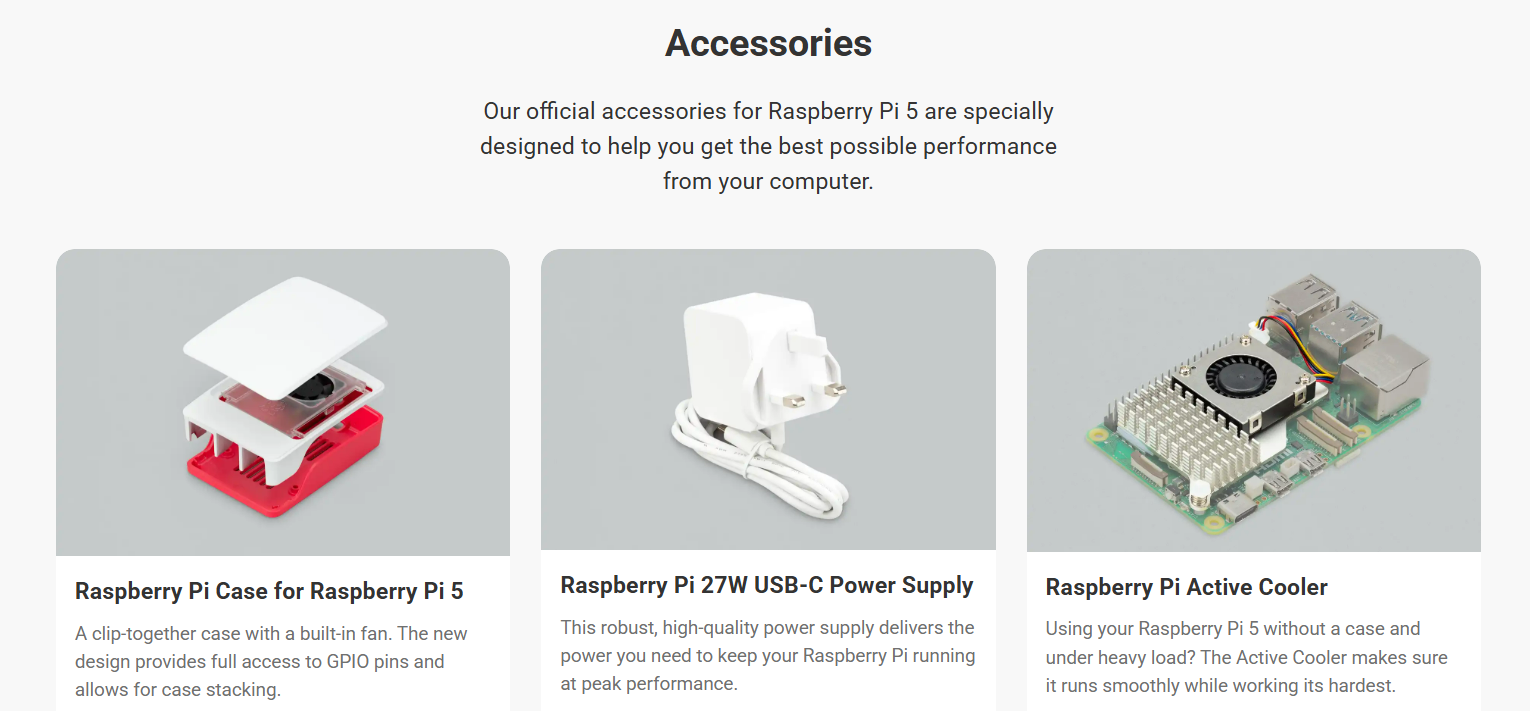
Raspberry pi case , USB power supply and Active cooler
- A 256GB Raspberry Pi SSD
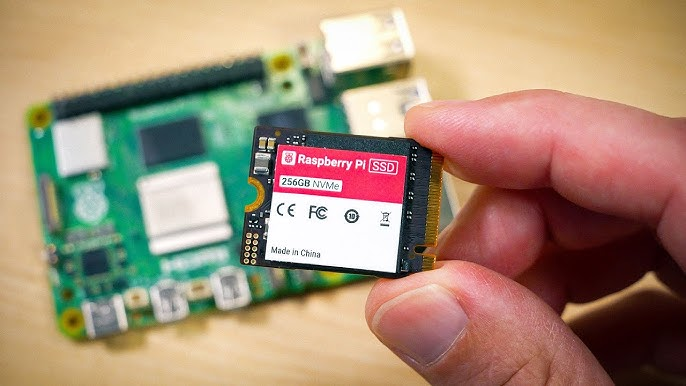
I think Raspberry Pi made their own SSD (specifically 2230) because of Pi6. when they release Pi6 with nvme slot (which they should have done with Pi 5) they can easily bundle it and sell more, essentially redirecting the profits to their own pockets instead of other storage manufacturers.
Question-1: Why VNC Disconnects (VNC Not Connected)
- VNC disconnections are usually caused by three main factors:
- Network Stability: If your Ethernet or Wi-Fi connection drops every 10 minutes (as you mentioned before), VNC will immediately terminate.
- Sleep Mode or Screen Blanking: If the Raspberry Pi enters “Screen Blanking” mode, the VNC session often pauses or disconnects. Go to Display Options in your settings and turn Screen Blanking off.
- Resolution Issues: If the Raspberry Pi is running without a monitor (Headless mode), VNC may struggle to start. To fix this, use
raspi-configto go to Display Options > VNC Resolution and set a fixed resolution (e.g., 1280x720).
2. Ethernet Cable & Speed Issues
You mentioned your line is 200 Mbps but you only need 50 Mbps. Here is a clarification:
- Higher Speed is Not a Problem: If your cable or router supports 200 Mbps, running at 50 Mbps is perfectly fine. The issue isn’t the speed; it’s the quality. If the cable is not Cat5e or Cat6 standard, the connection may drop repeatedly.
- Capacity vs. Requirement: Raspberry Pi 4 or 5 models have Gigabit Ethernet. Using a very cheap or low-quality Ethernet cable can cause data loads to fail, leading to connection drops.
Recommended Solutions:
- Change the Cable: Try a high-quality, short Ethernet cable connected directly to the router to see if the 10-minute disconnection persists.
- Power Check: The most common reason for Ethernet dropping is the Power Supply. If the red LED on your Pi flickers, it isn’t getting enough voltage, causing the network card to restart repeatedly.
- Terminal Check: To see the status of your Ethernet port, type this command:If you see “link down” or “reset” appearing multiple times, it is a hardware or power issue.
dmesg | grep eth0
Question-3: Using CMD or PowerShell on Windows
To restart your Windows network configuration, use these commands one by one (Run as Administrator):
ipconfig /release
ipconfig /renew
ipconfig /flushdns
Question-4: Keyboard Language Problem
If you are having trouble with the keyboard layout (e.g., the “@” symbol is in the wrong place), it is likely set to UK English instead of US English.
Quick Command Trick:
If the graphical settings don’t work, open the Terminal (Ctrl+Alt+T) and type this command to temporarily set the layout to US:
setxkbmap us
To change it permanently via the menu:
- Type
sudo raspi-config. - Go to Localization Options.
- Select Keyboard Layout.
- Choose Generic 105-key PC (Intl.) > Other > English (US).
sudo setxkbmap us
Question-1 Why is the Raspberry Pi widely used for DIY (Do-It-Yourself) projects instead of a regular laptop?
Answer: The Raspberry Pi is preferred for DIY projects due to the following reasons:
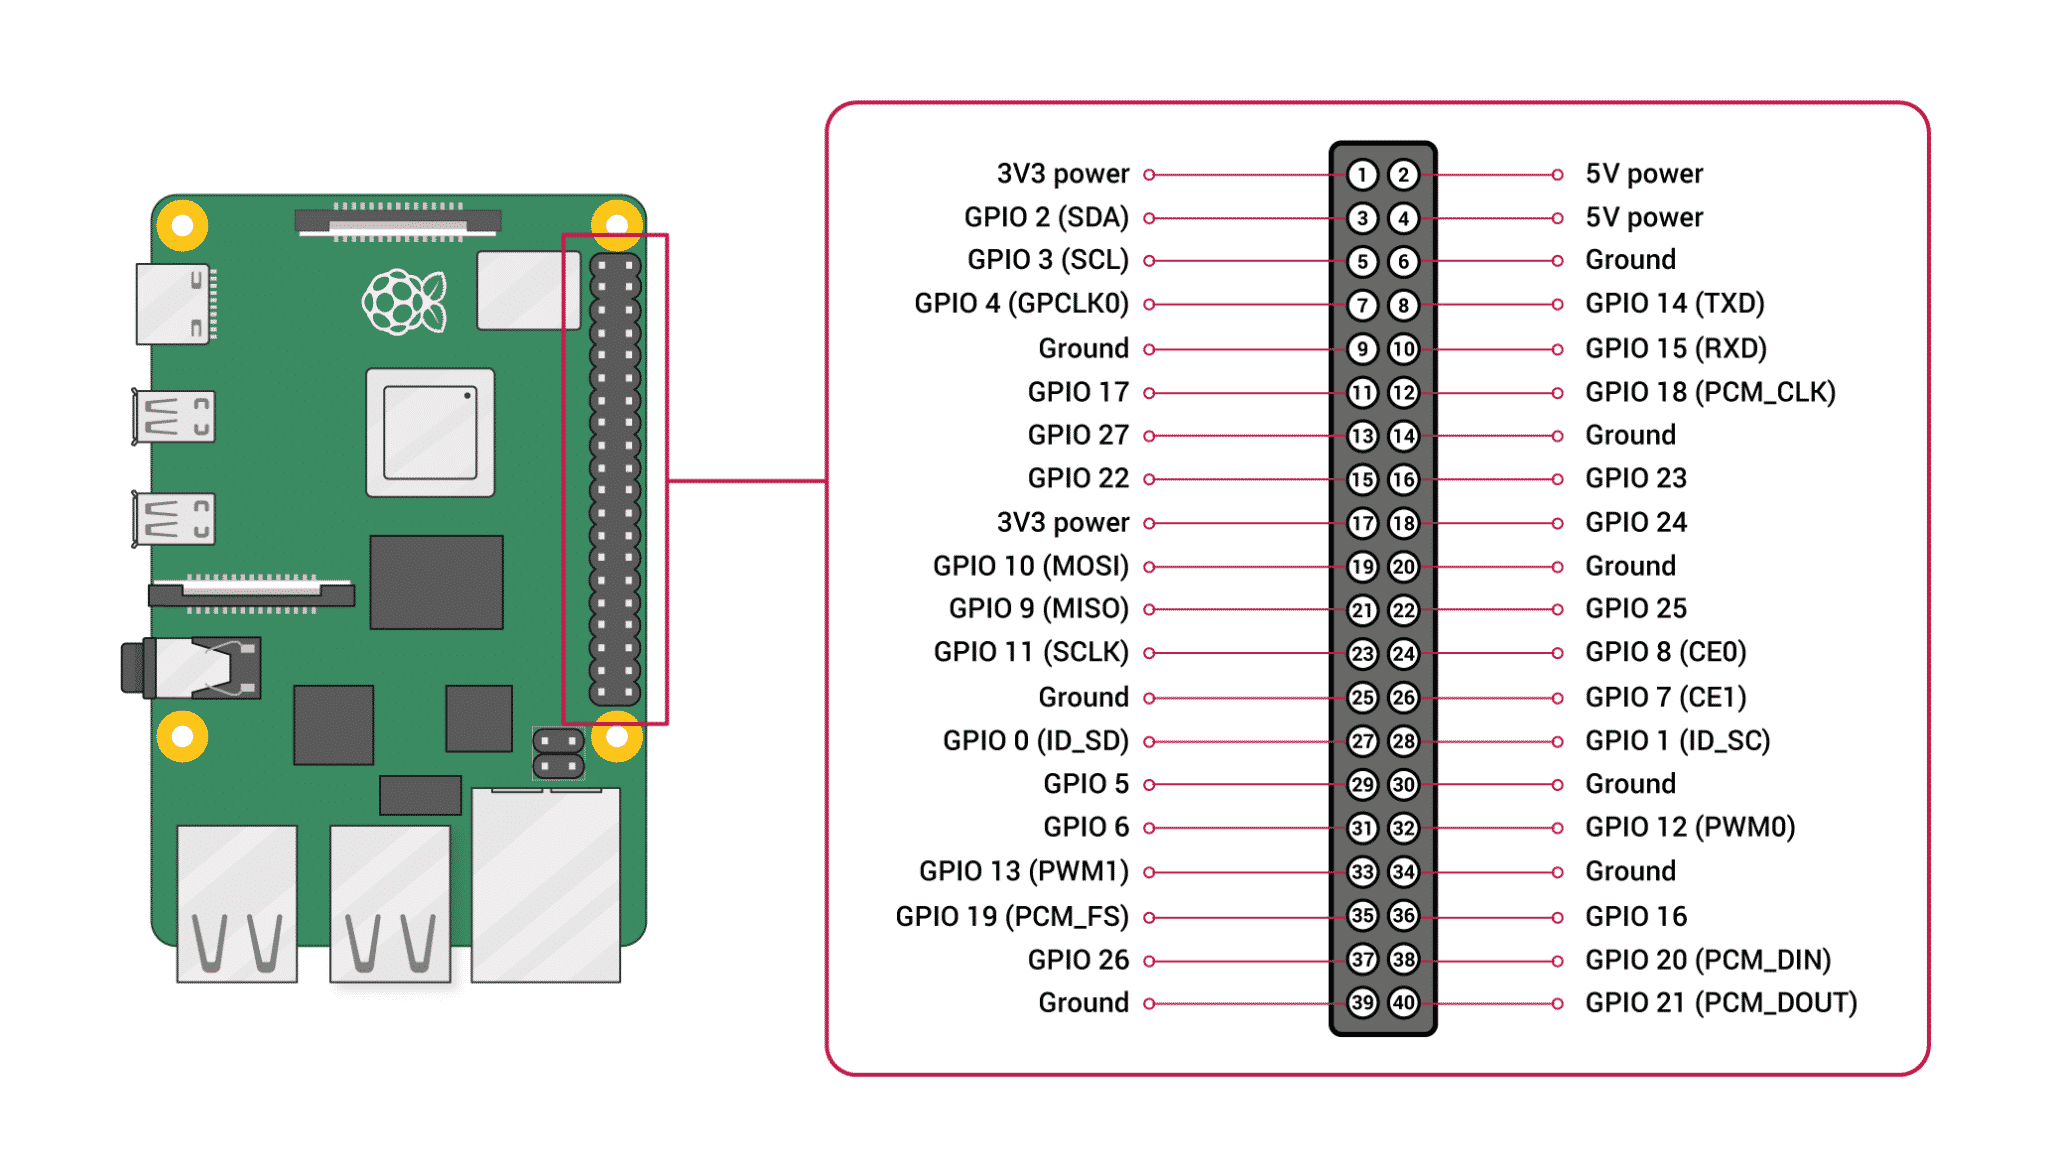
- GPIO Pins: It has 40 General Purpose Input/Output pins that allow it to interact directly with hardware like sensors and motors.
- Affordability: It provides a full computer experience at a fraction of the cost of a laptop.
- Low Power Consumption: It can run 24/7 (as a server or ad-blocker) while consuming very little electricity.
- Size: Its compact, credit-card size makes it ideal for embedding into small gadgets like robots or smart mirrors.
Question-2 Comparison Table: Raspberry Pi 500 vs. Standard Laptop
| Feature | Raspberry Pi 500 | Standard Laptop |
|---|---|---|
| Design | Keyboard-integrated computer | All-in-one portable device |
| Display | Needs external monitor/TV | Built-in screen |
| Power Source | Constant power supply (No battery) | Built-in rechargeable battery |
| Hardware Control | Features 40 GPIO pins for DIY | No direct hardware control pins |
| Architecture | ARM-based (Cortex-A76) | x86-based (Intel/AMD) |
| Best Usage | Learning, Coding, Hardware Projects | Business, Gaming, Travel |
Question-3 Why is Scratch and Another free project considered a great tool for beginners on Raspberry Pi?
Answer: Scratch is used because:
- Visual Learning: It uses a drag-and-drop interface, making coding accessible to everyone without worrying about complex syntax.
- Hardware Interaction: It allows users to control physical components (like LEDs and sensors) via GPIO pins using simple visual blocks.
- Foundation Building: It teaches fundamental logic, loops, and variables, which are essential for moving on to professional languages like Python.
Question-4 What makes the Raspberry Pi Zero 2 W different from a standard Raspberry Pi 4?
Answer: The Zero 2 W is designed for portability and low power consumption. While it is less powerful than the Pi 4 and has less RAM (512MB vs up to 8GB), its tiny form factor and low cost make it ideal for embedded IoT projects.
| Feature | Details |
|---|---|
| Processor | Quad-core 64-bit Arm Cortex-A53 @ 1GHz |
| Wireless | 2.4GHz IEEE 802.11b/g/n wireless LAN |
| Ports | Mini HDMI, Micro-USB (Power & OTG), microSD |
| Camera | CSI-2 connector for camera modules |
Question-4 Comparison: Industry vs. Home Usage of PI
| Usage Category | Industry (Industrial) | Home (Domestic) |
|---|---|---|
| Primary Goal | Efficiency, Monitoring & Automation | Entertainment, Security & Convenience |
| Model Used | Compute Module 4 / Industrial Cases | Raspberry Pi 4, 5, or Zero 2 W |
| Environment | Harsh (Heat, Dust, 24/7 run) | Controlled (Standard Room Temperature) |
| Software | Custom PLC software, MQTT, Node-RED | Home Assistant, Pi-hole, Kodi |
| Cost Focus | Scalability and Reliability | Affordability and Ease of Use |
Question-5 Can I use a Raspberry Pi Pico 2 W instead of a Raspberry Pi 4 for my project?
Answer: No, they serve different purposes.
- Use Raspberry Pi 4 if you need a full operating system, high processing power, and multiple USB/HDMI ports.
- Use Pico 2 W if you need a tiny, low-power, and affordable device for specific IoT tasks like reading sensors or controlling LEDs wirelessly.
| Feature | Pico 2 W | Raspberry Pi 4 |
|---|---|---|
| Category | Microcontroller | Full Computer |
| Power Consumption | Extremely Low | High |
| Boot Time | Instant (Milliseconds) | Slow (Seconds) |
| Ideal For | IoT Sensor Nodes | Media Centers, Servers |
| Need operating system | No OS,directly code | Have Os |
Question-6: Which is better: Raspberry Pi 4 or ESP32?
| Feature | ESP32 | Raspberry Pi 4 |
|---|---|---|
| Power Efficiency | Consumes very little power; has deep-sleep modes. | High power consumption; needs 5V/3A supply. |
| Booting | Instant-on (Starts in milliseconds). | Needs time to load an Operating System. |
| Price | Affordable ($5 - $8). | More expensive ($45+). |
| Connectivity | Built-in WiFi/Bluetooth (Low Power). | Full range of ports (USB, HDMI, Ethernet). |
| Use | IoT, Sensors, Automation | Servers, Desktop, AI |
Question-7 What makes a device “Embedded”?
Answer: A device is considered embedded when it is integrated into a larger system to perform a single specialized task. Key characteristics include:
- Efficiency: Optimized for its specific job.
- Reliability: Designed to run 24/7 without crashing.
- Real-time: Often responds instantly to physical sensors.
Comparison Table
| Aspect | General Computer | Embedded System |
|---|---|---|
| Goal | Flexibility (Many apps) | Efficiency (One task) |
| Form Factor | Desktop / Laptop | Integrated Chip ( Like washing machine, smart watch ) |
| Boot Speed | Slow (Loading OS) | Instant-on |
Question-8 About the Raspberry Pi Foundation
Core Mission: “To put the power of computing and digital making into the hands of people all over the world.”
Major Initiatives:
- Code Club & CoderDojo: Millions of young people learn to code in these free, volunteer-led clubs.
- Coolest Projects: A world-leading tech showcase for young innovators.
- Free Resources: Providing open-source learning materials for Python, Scratch, and Hardware Projects.
Question-9 Is the Raspberry Pi Foundation just a hardware company like raspberry pi-4?
Answer: No. While they design famous hardware, their primary goal is Education. The profits from hardware sales go directly back into funding global educational programs.
Question-9 Forums.raspberrypi.com
Answer: The Raspberry Pi Forums is the best place. It has a famous sticky thread called “The Boot Problem Sticky” which covers 99% of common startup issues.
Forum Sections:
- General Discussion: For news and general topics.
- Troubleshooting: Specialized help for hardware and software bugs.
- Projects: A place to show off what you have built.
- Education: For teachers and students using Pi in classrooms.
Pro Tip: Before asking a question, always use the Search bar. Most likely, someone else already solved the same problem!
Along the way, I was reminded that:
- The best learning often happens when you connect theory to practice
- Kids are naturally curious about technology and eager to explore
- A simple “What if we try this?” can become an amazing shared experience
The Technical Implementation
The app we created features:
- Visual Tree Representation: Combinations displayed as growing trees with colorful nodes
- Real-time Pattern Visualization: Dynamic updates as parameters change
- Multilingual Support: Available in English, French, Spanish, and Italian
- Interactive Controls: Easy-to-use interface for exploring different combinations
- Educational Focus: Designed specifically for learning mathematical concepts
Key Insights from This Experience
1. The Power of Visual Learning
Converting abstract mathematical concepts into visual representations made the learning process much more intuitive. Vicente could immediately see patterns and relationships that would have been difficult to grasp from equations alone.
2. Technology as an Educational Tool
This experience reinforced my belief that technology, when thoughtfully applied, can be a powerful educational tool. The key is making it accessible and engaging rather than overwhelming.
3. The Importance of Play in Learning
The moment Vicente said “It’s like a game!” was a perfect reminder that learning should be enjoyable. When children are having fun, they’re more likely to retain information and develop a genuine interest in the subject.
The Multilingual Approach
One of my favorite features of the app is its multilingual support. We wanted Vicente—and any child—to be able to explore combinations in English, French, Spanish, or Italian. Making learning accessible and inclusive is a win for everyone!
This feature was particularly important to us as a family navigating multiple cultures and languages in our daily lives.
Looking Forward
This project has inspired me to explore more ways to:
- Bridge the gap between traditional education and modern technology
- Create interactive learning tools for various subjects
- Share these experiences with other parents and educators
- Develop more educational applications that make learning fun
The App
You can explore the app we created here:
🚀 Interactive Combinations App
Conclusion
Now, with a few emojis and some code, we’ve made math visual and intuitive. It’s amazing to see a concept from a book become an app that makes learning exciting—and memorable!
This father-son coding adventure has taught me that the best educational experiences often come from combining traditional learning with modern technology. When we make learning interactive, visual, and fun, we open up new possibilities for understanding and engagement.
The journey from math book to app has been more than just a coding project—it’s been a beautiful reminder of how technology can bring families together while making education more accessible and enjoyable for everyone involved.
--- Our projectt for unauthorized detection --------
Real VNC Credentials
Username: mohi
Password: 6738 or 12345678
Step 1: Update the System
First, connect to the internet and update your Raspberry Pi’s package list.
sudo apt update && sudo apt dist-upgrade -y
Step 2: Install Necessary Software
We will install VLC for video streaming and dnsmasq for network management.
sudo apt install vlc dnsmasq -y
Step 3: Configure Static IP
Disconnect from the internet and set a fixed IP address for your Ethernet port. Open the configuration file:
sudo nano /etc/dhcpcd.conf
Scroll to the very bottom and add these lines:
interface eth0
static ip_address=192.168.0.10/24
static routers=192.168.0.1
static domain_name_servers=8.8.8.8
Press Ctrl+O, Enter to save, and Ctrl+X to exit. Then, restart the service:
sudo systemctl restart dhcpcd
Step 4: Configure dnsmasq
This service will automatically assign an IP address to your IP camera.
- Backup the old configuration:
sudo mv /etc/dnsmasq.conf /etc/dnsmasq.conf.orig - Create a new configuration:
sudo nano /etc/dnsmasq.conf - Check syntax and restart:
dnsmasq --test
sudo systemctl restart dnsmasq
Step 5: Assign IP for Camera
Use the following commands to manually set the network interface:
sudo nmcli con mod "netplan-eth0" ipv4.addresses 192.168.0.10/24 ipv4.method manual
sudo nmcli con up "netplan-eth0"
Step 6: Verify Connections
Check Raspberry Pi IP:
ip addr show eth0
Find Camera IP (Look for the Lease): Wait about 1 minute after connecting the camera, then run:
cat /var/lib/misc/dnsmasq.leases
Step 7: Start Video Streaming
Once you have the camera’s IP (replace [IP] with the actual address from Step 6), run:
cvlc "rtsp://mohi:6738@[IP]:554/cam/realmonitor?channel=1&subtype=0"
Step 8: Alternative Camera Access
If the previous stream fails, try the ONVIF path:
cvlc "rtsp://mohi:6738@192.168.0.67:554/onvif1"
```python
MOTHION DETECTION SENSOR
Firstly connection LED and rasp pin
rasp 12 = LED pin that no registor
rasp 14 = LED pin that has registor
Secondly Passive inferrad(PIR) senssor
Rasp pin 2 = PIR sensor base pin connection
Rasp pin 6 = PIR sensor ground pin connection
Rasp pin 11 = PIR sensor out pin connection
Thirdly in pasrberrypi 3 b+ open
1. left corenr in raspberry pi has **Thonny software**
2. paste this code
from gpiozero import MotionSensor, LED
from signal import pause
import time

pir = MotionSensor(17)
led = LED(18)

print("Sensor is warming up...")
time.sleep(10)
print("Sensor is Ready!")

def motion_detected():
    print("Motion Detected! LED ON")
    led.on()

def no_motion():
    print("No Motion. LED OFF")
    led.off()

pir.when_motion = motion_detected
pir.when_no_motion = no_motion

pause()
3. open a new file and save this as pir.py
4. Run button and then see output in terminal
This steps for image capture when motion detected uisng PIR sensor
Install openCV
sudo apt install python3-opencv -y