
LED blinking project with IOTA
Reflecting on receiving recognition for academic excellence from Air Bangladesh during my graduation from the Artificial Intelligence and Machine Learning program at Collège LaSalle, Dhaka.
academic
ai
machine-learning
“Vicente, want to see how we can make an app from these concepts?”
That simple question sparked something special. Today we were studying combinations in his math book. Instead of just working through the exercises, I thought—why not bring these ideas to life with code?
The app
The app

The app
What followed was a father-son journey, transforming abstract math into something interactive and fun! We built an app that visualizes combinations as colorful trees, letting Vicente see patterns grow in real time.

This image is highlite setup steps
সহজ কথায়, Boot (বুট) মানে হলো কম্পিউটার বা ল্যাপটপ চালু হওয়ার প্রক্রিয়া। যখন আপনি পাওয়ার বাটন চাপেন, তখন থেকে শুরু করে স্ক্রিনে ‘Windows’ বা ‘Desktop’ আসা পর্যন্ত কম্পিউটার ভেতরে যে কাজগুলো করে, তাকেই Booting বলা হয়।
কম্পিউটারের প্রধান মেমোরি বা RAM থাকে অস্থায়ী (Volatile)। অর্থাৎ, কম্পিউটার বন্ধ করলে র্যাম সম্পূর্ণ খালি হয়ে যায়। তাই কম্পিউটার চালু করার সময় তাকে নতুন করে শেখাতে হয় কীভাবে কাজ করতে হবে। এই ‘শেখানোর’ বা অপারেটিং সিস্টেমকে (OS) হার্ডডিস্ক থেকে র্যামে আনার প্রক্রিয়াই হলো বুট।
These settings allow you to configure the Pi before you even turn it on for the first time, making the first boot seamless.
mypi.local. Instead of memorizing a complex IP address (like 192.168.1.15), you can just type this name in your browser or terminal to find it.@ or #) work correctly when you type.rahul_piAmi@Pi2024| Feature | Remote Access SSH (Secure Shell) | Raspberry Pi Connect |
|---|---|---|
| Location | Usually from the same Wi-Fi network. | From anywhere in the world (via internet). |
| Method | Text-based. You type commands in a terminal window. | Visual. You see the full desktop and use your mouse. |
| Best Use Case | For quick updates or changing system files. | When you need to see the screen or use GUI apps remotely. |
When your Raspberry Pi is used without a dedicated monitor, keyboard, or mouse, it is called “Headless Mode.” Remote access allows you to control the device from another computer or mobile device.
If your Pi and your laptop are on the same Wi-Fi network, you can use these two methods:
ssh rasp1@192.168.1.x is SSH. It is very fast and efficient for text-based tasks.if host is not identified
ssh-keygen -R 192.168.1.x
খ. কমান্ড লাইনের মাধ্যমে (Terminal ব্যবহার করে)
১. টার্মিনালে লিখুন: sudo raspi-config
২. Interface Options-এ গিয়ে Enter চাপুন।
৩. VNC সিলেক্ট করে Enter চাপুন।
৪. "Would you like the VNC Server to be enabled?" প্রশ্ন আসলে Yes সিলেক্ট করুন।
৫. কাজ শেষ হলে Esc চেপে বের হয়ে আসুন।
যখন আপনার ডিভাইসের সামনে সশরীরে বসে কাজ করা সম্ভব হয় না, তখন VNC ব্যবহার করা হয়। এর দুটি অংশ থাকে:
Server (সার্ভার): এটি আপনার Raspberry Pi-তে চলে।
Client (ক্লায়েন্ট): এটি আপনার ল্যাপটপ, ট্যাবলেট বা ফোনে চলে।
To control your Pi when you are away from home (on a different network):
রাসবেরি পাই-কে (Raspberry Pi) নেটওয়ার্ক বা আপনার কম্পিউটারের সাথে কানেক্ট করার বেশ কয়েকটি জনপ্রিয় পদ্ধতি রয়েছে। আপনার প্রয়োজন অনুযায়ী আপনি যেকোনো একটি বেছে নিতে পারেন:
এটি বর্তমানে সবচেয়ে জনপ্রিয় পদ্ধতি, কারণ এতে কোনো তারের প্রয়োজন হয় না।
আপনি সরাসরি একটি ইথারনেট ক্যাবল দিয়ে পাই-কে আপনার ল্যাপটপ বা রাউটারের সাথে যুক্ত করতে পারেন।
আপনার বাড়িতে যদি একটি ওয়াইফাই রাউটার থাকে, তবে পাই সরাসরি সেই রাউটারের সাথে কানেক্ট হতে পারে।
সুবিধা: একই রাউটারে থাকা সব ডিভাইস থেকে পাই-কে অ্যাক্সেস করা যায়।
ব্যবহার: সাধারণত খুব ছোট ডেটা বা সেন্সর রিডিং পাঠানোর জন্য এটি ব্যবহৃত হয়।
আপনার ফোনের ইন্টারনেট সরাসরি ইউএসবি ক্যাবল দিয়ে পাই-তে শেয়ার করা যায়।
যদি আপনার কাছে মনিটর বা নেটওয়ার্ক কিছুই না থাকে, তবে USB-to-TTL অ্যাডাপ্টারের মাধ্যমে পাই-এর GPIO পিন ব্যবহার করে সরাসরি টার্মিনালে ঢোকা যায়।
এসডি কার্ডে অপারেটিং সিস্টেম রাইট করার সময় “Raspberry Pi Imager”-এ ওয়াইফাই এবং এসএসএইচ (SSH) সেটিংস আগে থেকেই লিখে দেওয়া যায়। এতে পাই প্রথমবার চালু করার সাথে সাথেই স্বয়ংক্রিয়ভাবে আপনার পরিচিত নেটওয়ার্কে কানেক্ট হয়ে যায়।
Sometimes you don’t need to see the screen; you just need to move files between your laptop and the Pi.
১. SCP (Secure Copy Protocol) কী? SCP হলো SSH-এর মাধ্যমে ফাইল কপি করার একটি নিরাপদ পদ্ধতি। এর মাধ্যমে আপনি আপনার কম্পিউটার থেকে Raspberry Pi-তে বা Raspberry Pi থেকে কম্পিউটারে ফাইল পাঠাতে পারেন।
Raspberry Pi-তে ফাইল পাঠানো (Upload) আপনার কম্পিউটারের কোনো ফাইল (যেমন: myfile.txt) Raspberry Pi-তে পাঠাতে এই কমান্ডটি ব্যবহার করুন:
Bash
scp myfile.txt
Raspberry Pi থেকে ফাইল আনা (Download) Pi থেকে কোনো ফাইল আপনার কম্পিউটারের বর্তমান ডিরেক্টরিতে আনতে চাইলে:
Bash
scp
একাধিক ফাইল বা ফোল্ডার কপি করা
একাধিক ফাইল: ফাইলগুলোর নাম স্পেস দিয়ে লিখুন: scp file1.txt file2.txt
ওয়াইল্ডকার্ড ব্যবহার: সব টেক্সট ফাইল পাঠাতে: scp *.txt
ফোল্ডার কপি করা: পুরো একটি ফোল্ডার এবং তার ভেতরের সব ফাইল কপি করতে -r (recursive) ফ্ল্যাগ ব্যবহার করুন:
scp -r project/
To see IP address in your device
hostname -I

or

nmcli device show
system update
sudo apt update && sudo apt upgrade -y
See temprature
vcgencmd measure_temp
Ram or memory chack
free -h
SSH logout
exit
| Service | Interface | Network | Main Advantage |
|---|---|---|---|
| SSH | Command Line | Local | Fast and lightweight |
| VNC | Full Desktop | Local | Graphical interface (GUI) |
| Pi Connect | Browser Screen | Internet | Access from anywhere |
| Samba | Folders/Drives | Local | Easy drag-and-drop files |
If you can access your Pi via SSH (as rasp1@192.168.1.7) but TigerVNC fails, follow these steps to fix it.
Modern Raspberry Pi OS versions use Wayland instead of the old X11 display system. Traditional VNC servers (like TigerVNC or RealVNC) often struggle with Wayland’s security layers.
Since you are already logged in as rasp1, run these commands in your terminal:
sudo raspi-configIf TigerVNC still won’t connect, you might need to switch the display backend back to X11:
sudo raspi-config, go to: 6 Advanced OptionsOnce the Pi reboots, open TigerVNC on your Windows PC:
192.168.1.7 (or 192.168.1.7:5900)rasp1Ami@Pi2024)If you want to stay on Wayland (the faster, newer system), TigerVNC might not be the best tool. You should use a VNC viewer that supports WayVNC.
Tip: If all else fails, try Raspberry Pi Connect. It works through your web browser and bypasses all VNC setup headaches!
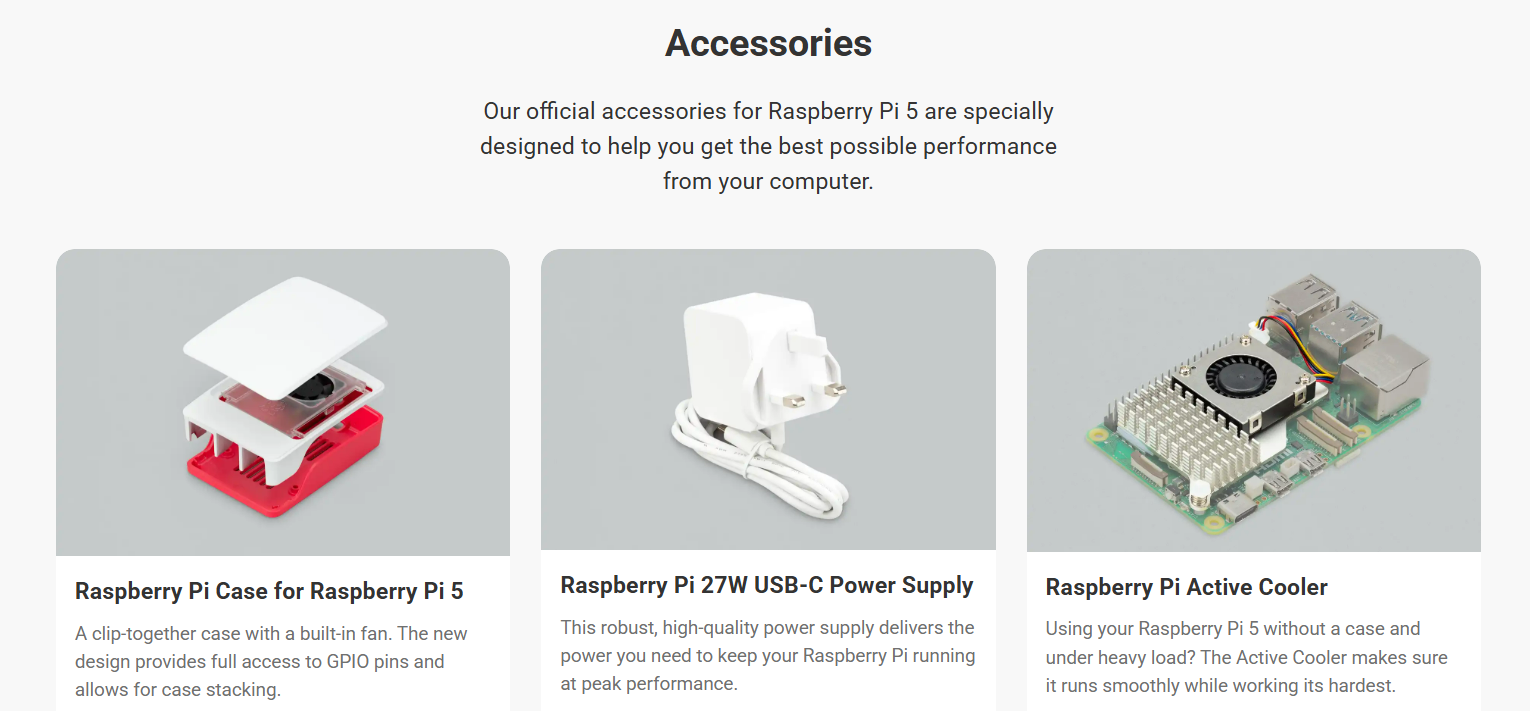
Raspberry pi case , USB power supply and Active cooler
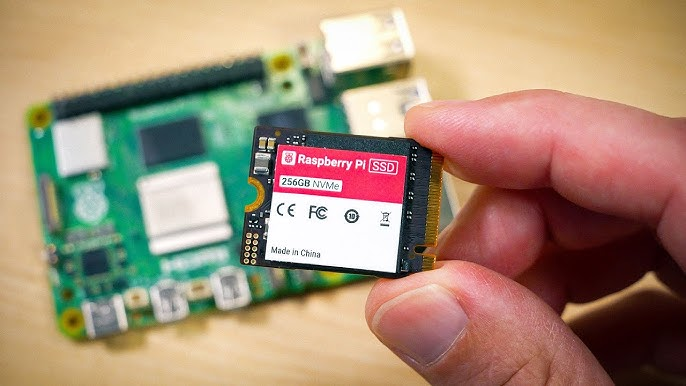
I think Raspberry Pi made their own SSD (specifically 2230) because of Pi6. when they release Pi6 with nvme slot (which they should have done with Pi 5) they can easily bundle it and sell more, essentially redirecting the profits to their own pockets instead of other storage manufacturers.
Question-1 VNC মাঝে মাঝে ডিসকানেক্ট হওয়ার কারণ (VNC Not Connected)
raspi-config থেকে Display Options > VNC Resolution এ গিয়ে একটি নির্দিষ্ট রেজোলিউশন (যেমন ১২৮০x৭২০) সেট করে দিন।আপনি বলেছেন আপনার লাইন 200 Mbps কিন্তু আপনার প্রয়োজন মাত্র 50 Mbps। এখানে একটি ভুল ধারণা থাকতে পারে:
১. ক্যাবল পরিবর্তন: প্রথমে একটি ভালো মানের ছোট ইথারনেট ক্যাবল দিয়ে সরাসরি রাউটারের সাথে যুক্ত করে দেখুন ১০ মিনিট পর ডিসকানেক্ট হয় কি না। ২. পাওয়ার চেক: আপনার ইথারনেট বারবার ডিসকানেক্ট হওয়ার প্রধান কারণ হতে পারে Power Supply। রাসবেরি পাই-এ যদি লাল বাতিটি মিটমিট করে জ্বলে, তবে বুঝবেন সেটি পর্যাপ্ত বিদ্যুৎ পাচ্ছে না, যার ফলে নেটওয়ার্ক কার্ডটি বারবার রিস্টার্ট নিচ্ছে। ৩. টার্মিনাল চেক: আপনার ইথারনেট পোর্টের স্ট্যাটাস দেখতে টার্মিনালে এই কমান্ডটি লিখুন:
dmesg | grep eth0
এখানে যদি “link down” বা “reset” জাতীয় লেখা বারবার আসে, তবে বুঝবেন এটি হার্ডওয়্যার বা পাওয়ারের সমস্যা।
Question-1 ১. কমান্ড প্রম্পট (CMD) বা PowerShell দিয়ে
উইন্ডোজের নেটওয়ার্ক কনফিগারেশন রিস্টার্ট করতে এই কমান্ডগুলো একে একে ব্যবহার করুন (অবশ্যই Run as Administrator দিয়ে ওপেন করবেন):
ipconfig /release
ipconfig /renew
ipconfig /flushdns
Question-1 Keuboard language problem
একটি কুইক কমান্ড ট্রিক:
যদি গ্রাফিকাল সেটিংসে কাজ না হয়, তবে টার্মিনাল (Ctrl+Alt+T) খুলে নিচের কমান্ডটি লিখে এন্টার দিন:

sudo setxkbmap us
Bash sudo setxkbmap us Question-1 Why is the Raspberry Pi widely used for DIY (Do-It-Yourself) projects instead of a regular laptop?
Answer: The Raspberry Pi is preferred for DIY projects due to the following reasons:
Question-2 Comparison Table: Raspberry Pi 500 vs. Standard Laptop
| Feature | Raspberry Pi 500 | Standard Laptop |
|---|---|---|
| Design | Keyboard-integrated computer | All-in-one portable device |
| Display | Needs external monitor/TV | Built-in screen |
| Power Source | Constant power supply (No battery) | Built-in rechargeable battery |
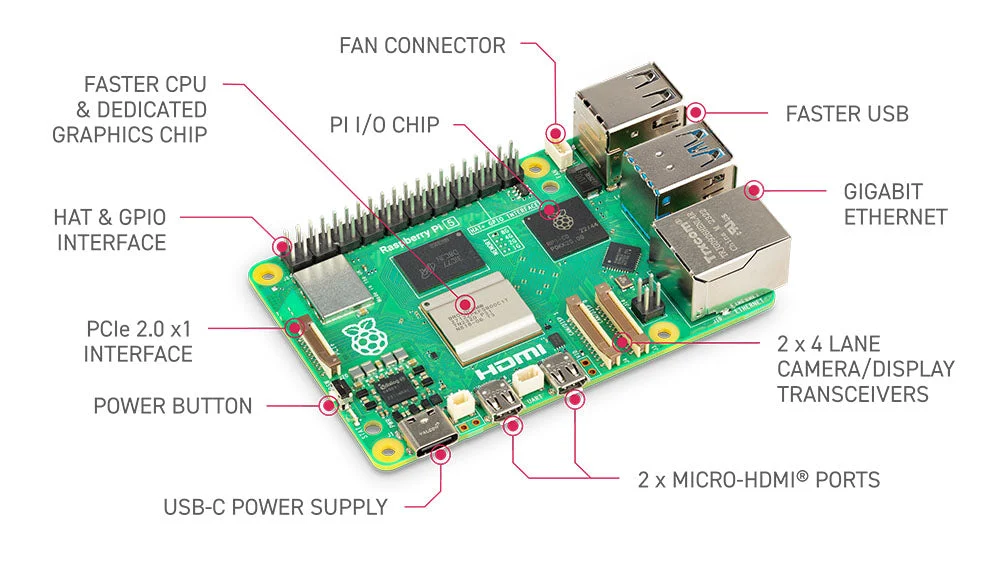
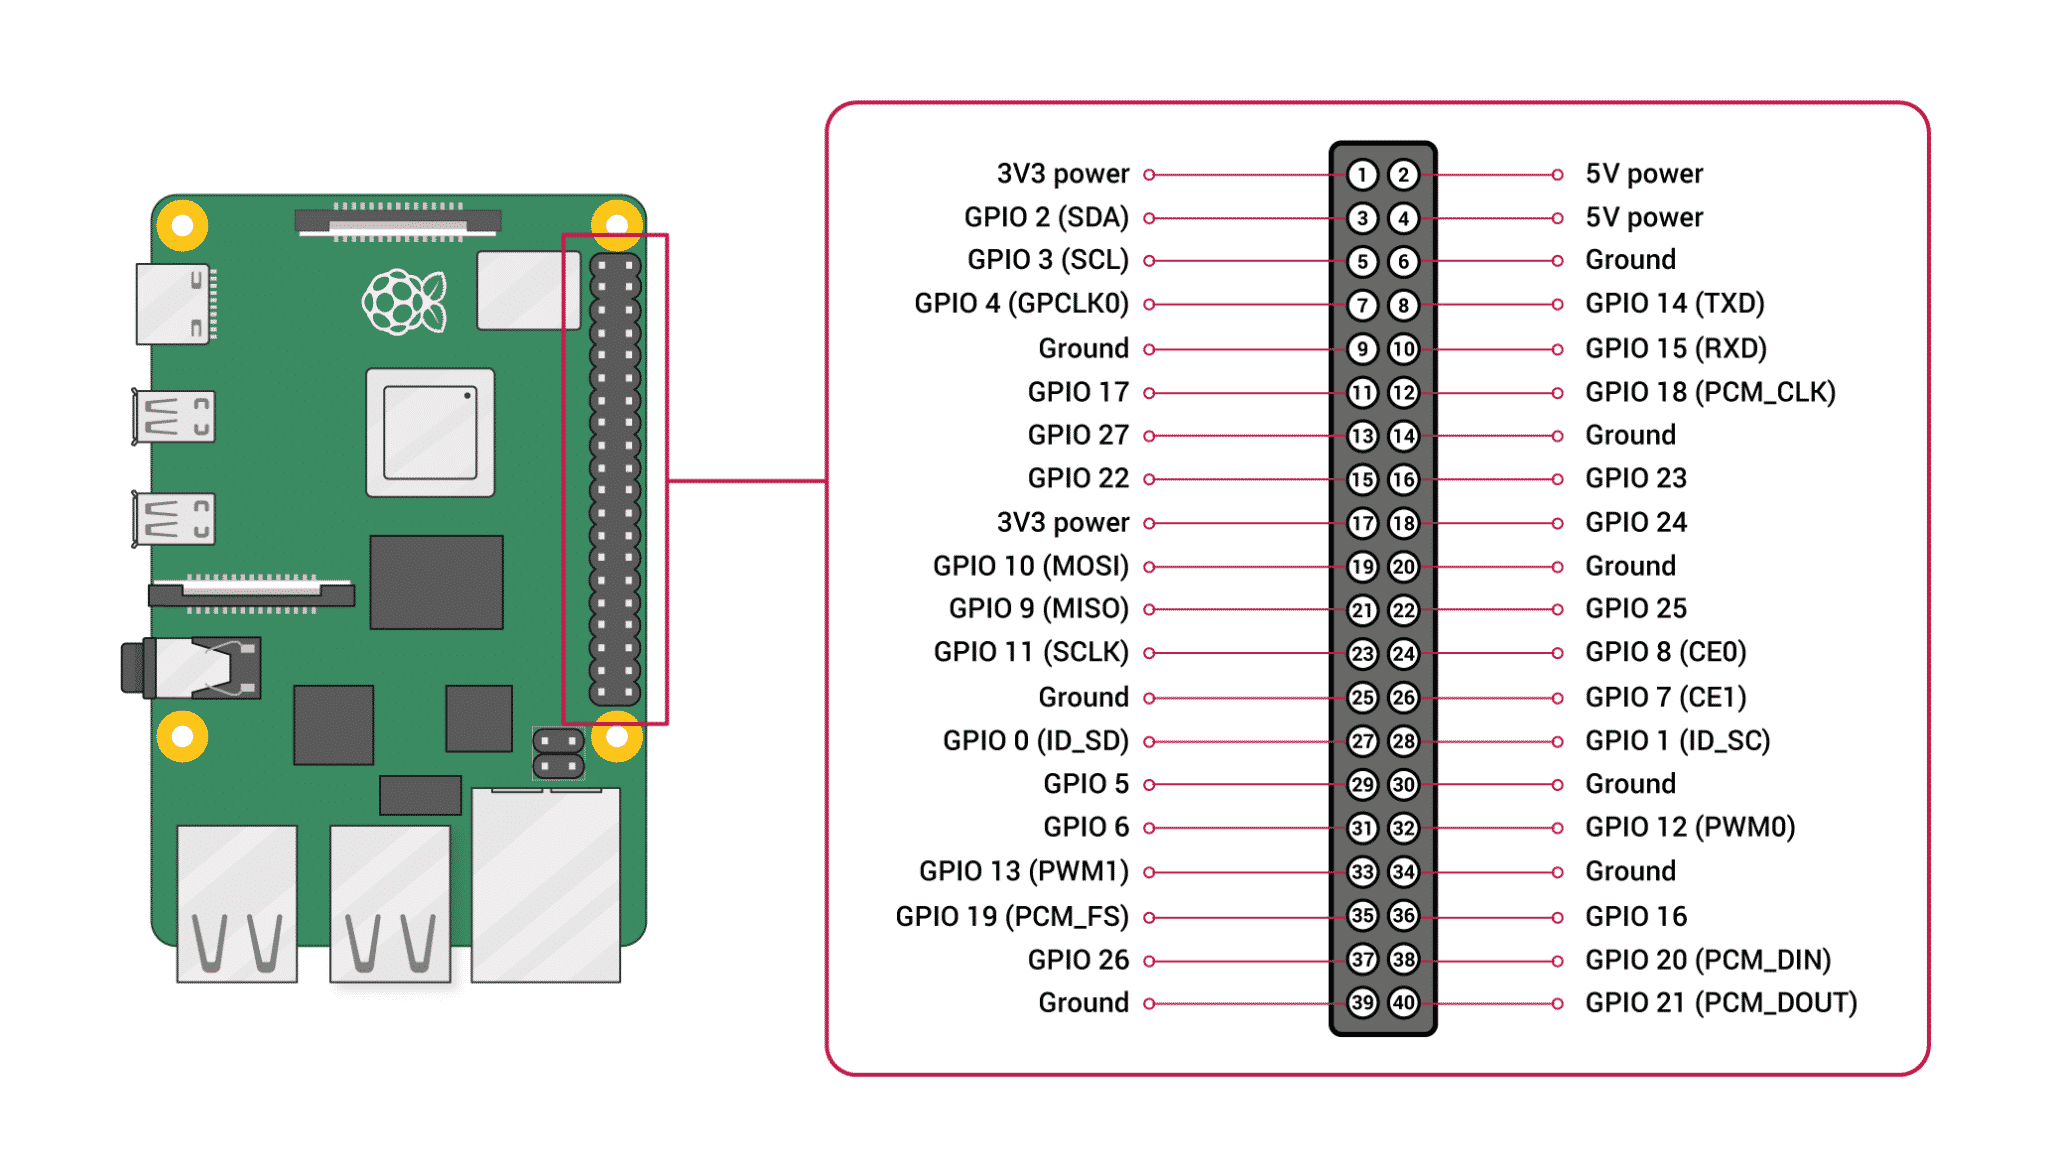
| Hardware Control | Features 40 GPIO pins for DIY | No direct hardware control pins |
| Architecture | ARM-based (Cortex-A76) | x86-based (Intel/AMD) |
| Best Usage | Learning, Coding, Hardware Projects | Business, Gaming, Travel |
Question-3 Why is Scratch and Another free project considered a great tool for beginners on Raspberry Pi?
Answer: Scratch is used because:
Question-4 What makes the Raspberry Pi Zero 2 W different from a standard Raspberry Pi 4?
Answer: The Zero 2 W is designed for portability and low power consumption. While it is less powerful than the Pi 4 and has less RAM (512MB vs up to 8GB), its tiny form factor and low cost make it ideal for embedded IoT projects.
| Feature | Details |
|---|---|
| Processor | Quad-core 64-bit Arm Cortex-A53 @ 1GHz |
| Wireless | 2.4GHz IEEE 802.11b/g/n wireless LAN |
| Ports | Mini HDMI, Micro-USB (Power & OTG), microSD |
| Camera | CSI-2 connector for camera modules |
Question-4 Comparison: Industry vs. Home Usage of PI
| Usage Category | Industry (Industrial) | Home (Domestic) |
|---|---|---|
| Primary Goal | Efficiency, Monitoring & Automation | Entertainment, Security & Convenience |
| Model Used | Compute Module 4 / Industrial Cases | Raspberry Pi 4, 5, or Zero 2 W |
| Environment | Harsh (Heat, Dust, 24/7 run) | Controlled (Standard Room Temperature) |
| Software | Custom PLC software, MQTT, Node-RED | Home Assistant, Pi-hole, Kodi |
| Cost Focus | Scalability and Reliability | Affordability and Ease of Use |
Question-5 Can I use a Raspberry Pi Pico 2 W instead of a Raspberry Pi 4 for my project?
Answer: No, they serve different purposes.
| Feature | Pico 2 W | Raspberry Pi 4 |
|---|---|---|
| Category | Microcontroller | Full Computer |
| Power Consumption | Extremely Low | High |
| Boot Time | Instant (Milliseconds) | Slow (Seconds) |
| Ideal For | IoT Sensor Nodes | Media Centers, Servers |
| Need operating system | No OS,directly code | Have Os |
Question-6: Which is better: Raspberry Pi 4 or ESP32?
| Feature | ESP32 | Raspberry Pi 4 |
|---|---|---|
| Power Efficiency | Consumes very little power; has deep-sleep modes. | High power consumption; needs 5V/3A supply. |
| Booting | Instant-on (Starts in milliseconds). | Needs time to load an Operating System. |
| Price | Affordable ($5 - $8). | More expensive ($45+). |
| Connectivity | Built-in WiFi/Bluetooth (Low Power). | Full range of ports (USB, HDMI, Ethernet). |
| Use | IoT, Sensors, Automation | Servers, Desktop, AI |
Question-7 What makes a device “Embedded”?
Answer: A device is considered embedded when it is integrated into a larger system to perform a single specialized task. Key characteristics include:
| Aspect | General Computer | Embedded System |
|---|---|---|
| Goal | Flexibility (Many apps) | Efficiency (One task) |
| Form Factor | Desktop / Laptop | Integrated Chip ( Like washing machine, smart watch ) |
| Boot Speed | Slow (Loading OS) | Instant-on |
Question-8 About the Raspberry Pi Foundation
Core Mission: “To put the power of computing and digital making into the hands of people all over the world.”
Question-9 Is the Raspberry Pi Foundation just a hardware company like raspberry pi-4?
Answer: No. While they design famous hardware, their primary goal is Education. The profits from hardware sales go directly back into funding global educational programs.
Question-9 Forums.raspberrypi.com
Answer: The Raspberry Pi Forums is the best place. It has a famous sticky thread called “The Boot Problem Sticky” which covers 99% of common startup issues.
Pro Tip: Before asking a question, always use the Search bar. Most likely, someone else already solved the same problem!
Along the way, I was reminded that:
The app we created features:
Converting abstract mathematical concepts into visual representations made the learning process much more intuitive. Vicente could immediately see patterns and relationships that would have been difficult to grasp from equations alone.
This experience reinforced my belief that technology, when thoughtfully applied, can be a powerful educational tool. The key is making it accessible and engaging rather than overwhelming.
The moment Vicente said “It’s like a game!” was a perfect reminder that learning should be enjoyable. When children are having fun, they’re more likely to retain information and develop a genuine interest in the subject.
One of my favorite features of the app is its multilingual support. We wanted Vicente—and any child—to be able to explore combinations in English, French, Spanish, or Italian. Making learning accessible and inclusive is a win for everyone!
This feature was particularly important to us as a family navigating multiple cultures and languages in our daily lives.
This project has inspired me to explore more ways to:
You can explore the app we created here:
🚀 Interactive Combinations App
Now, with a few emojis and some code, we’ve made math visual and intuitive. It’s amazing to see a concept from a book become an app that makes learning exciting—and memorable!
This father-son coding adventure has taught me that the best educational experiences often come from combining traditional learning with modern technology. When we make learning interactive, visual, and fun, we open up new possibilities for understanding and engagement.
The journey from math book to app has been more than just a coding project—it’s been a beautiful reminder of how technology can bring families together while making education more accessible and enjoyable for everyone involved.
Reflecting on receiving recognition for academic excellence from Air Bangladesh during my graduation from the Artificial Intelligence and Machine Learning program at Collège LaSalle, Dhaka.
A Streamlit app for managing student volunteers at Collège LaSalle Dhaka, helping organize welcome teams for new students.